Showing posts with label linux. Show all posts

Sunday, 19 May 2013

SquashFS Portage tree saving time and space

Gentoo Portage, as a package manager, has one annoying side-effect of using quite a lot of disk space and being, generally, slow. As I was looking to reduce the number of small file writes that emerge --sync inflicts on my SSD, I've came back to an old and dusty trick - keeping your portage tree as a SquashFS file. It's much faster than the standard setup and uses less (76MB vs almost 400MB) disk space. Interested? Then read on!

Squashes by Olivia Bee

Requirements:

  • SquashFS enabled in the kernel: File systems -> Miscellaneous filesystems -> <M> SquashFS 4.0 - Squashed file system support and [*] Include support for ZLIB compressed file systems
  • Installed sys-fs/squashfs-tools
  • Distfiles moved out of the portage tree, e.g. (in /etc/portage/make.conf): DISTDIR="/var/squashed/distfiles"

I'm also assuming that your /tmp folder is mounted as tmpfs (in-memory temporary file system) since one of the goals of this exercise is limiting the amount of writes emerge --sync inflicts on the SSD. You are using an SSD, right?

You will need an entry in /etc/fstab for /usr/portage:

/var/squashed/portage /usr/portage squashfs ro,noauto,x-systemd.automount 0 0

This uses a squashed portage tree stored as a file named /var/squashed/portage. If you are not using systemd then replace ro,noauto,x-systemd.automount with just ro,defaults.

Now execute mv /usr/portage/ /tmp/ and you are ready to start using the update script. Ah yes, forgot about this part! Here it is:

#!/bin/bash
# grab default portage settings
source /etc/portage/make.conf
# make a read-write copy of the tree
cp -a /usr/portage /tmp/portage
umount /usr/portage
# standard sync
rsync -avz --delete $SYNC /tmp/portage && rm /var/squashed/portage
mksquashfs /tmp/portage /var/squashed/portage && rm -r /tmp/portage
mount /usr/portage
# the following two are optional
eix-update
emerge -avuDN system world

And that's it. Since the SquashFS is read only, this script needs to first make a writeable copy of the tree (in theory, this is doable with UnionFS as well, but all I was able to achieve with it were random kernel panics), then updates the copy through rsync and rebuilds the squashed file. Make sure you have a fast rsync mirror configured.

For me, this decreased the on-disk space usage of the portage tree from over 400MB to 76MB, cut the sync time at least in half and made all emerge/eix/equery operations much faster. The memory usage of a mounted tree will be about 80MB, if you really want to conserve RAM you can just call umount /usr/portage when you no longer need it.

Sunday, 16 December 2012

SSD, GPT, EFI, TLA, OMG!

I finally bought an SSD, so I took the drive change as an excuse to try out some other nifty new technologies as well: UEFI and GPT. Getting them to work (along with a dual-boot operating systems - Gentoo + Windows 7) wasn't trivial so I'll describe what was required to get it all humming nicely.

The hardware part was easy. The laptop I have came with a 1TB 5.4k extra-slow hard drive plugged into it's only SATA-3.0 port, but that's not a problem. There's another SATA-2.0 port, dedicated to a DVD drive - why would anyone need that? I've replaced the main drive with a fast Intel SSD (450MBps write, 500MBps read, 22.5K IOPS - seriously, they've become so cheap that if you're not using one you must be some kind of a masochist that likes to stare blankly at the screen waiting for hard drive LEDs to blink), ordered a "Hard Driver Caddy" off eBay ($9 including postage, although it took 24 days to arrive from Hong Kong) and started system installation.

HDD and SSD on an open laptop

Non-chronologically, but sticking to the hardware topic: the optical drive replacement caddy comes in three different sizes (for slot drives/slim 9.5mm/standard 12.7mm) and that's pretty much the only thing you have to check before you order one. Connectors and even the masking plastic bits are standardised, so replacement operation is painless. A caddy itself weights about 35g (as much as a small candy bar), so your laptop will end a bit leaner than before.

DVD and an HDD in the caddy:
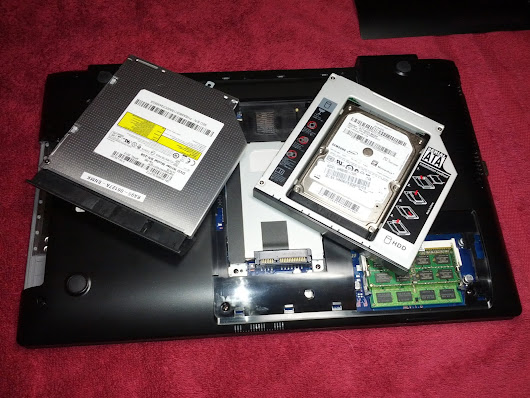
DVD and HDD in a replacement caddy

You'll want to remove the optical drive while it's ejected, as the release mechanism is electrical, and one of two hooks holding the bezel is only accessible when the drive is opened. I used a flat screwdriver to unhook it, but be careful, as the mask is quite flimsy and might break. Only a cosmetic problem, but still. Showing the hooks:

That's pretty much everything that's needed from the hardware side - now to the software. I was following a Superuser post Make UEFI, GPT, Bootloader, SSD, USB, Linux and Windows work together, which describes the dual boo installation procedure quite well. My first problem was that I couldn't get a UEFI boot to work from a DVD (when I still had it). Went for the easiest solution with Ubuntu Live USB that managed to start in the UEFI mode just fine.

There are quite a few "gotchas" here: you can't install a UEFI system if you're not already booted into UEFI mode (check dmesg output for EFI messages). The starting payload needs to be 64 bit and reside on a FAT32 partition on a GPT disk (oversimplifying a bit, but those are the requirements if you want to dual-boot with Windows). A side-note for inquiring minds: you'll also need a legal copy of Windows 7/8, as the pirate bootloaders require booting in BIOS mode. Oh, and your SATA controller needs to be set to AHCI mode, because otherwise TRIM commands won't reach your SSD drive and it will get slower and slower as it fills with unneeded (deleted, but not trimmed) data.

Once I had Ubuntu started, I proceeded with a mostly standard Gentoo installation procedure. Make sure you do your GPT partitioning properly (see the Superuser post, although the 100MB for EFI boot partition might be too much - I have 16MB used on it and that's unlikely to change) and remember to mount the "extra" partition in /boot/efi before you install Grub2. Additional kernel options needed are listed on Gentoo Wiki, Grub2 installation procedure for UEFI is documented there as well. Make sure that your Linux partitions are ext4 and have the discard option enabled.

All of this resulted in my machine starting - from pressing the power button to logging onto Xfce desktop - in 13 seconds. Now it was time to break it by getting Windows installed. Again, the main hurdle proved to be starting the damn installer in UEFI mode (and you won't find out in which mode it runs until you try to install to a GPT disk and it refuses to continue because of unspecified errors). Finally I got it to work by using the USB I had created for Ubuntu, replacing all of the files on the drive with Windows Installation DVD contents and extracting the Windows bootloader. That was the convoluted part, because a "normal" Windows USB key will only start in BIOS mode.

  • Using 7zip, open file sources/install.wim from the Windows installation DVD and extract \1\Windows\Boot\EFI\bootmgfw.efi from it.
  • On your bootable USB, copy the folder efi/microsoft/boot to efi/boot.
  • Now take the file you extracted and place it in efi/boot as bootx64.efi.

This gave me an USB key that starts Windows installer in UEFI mode. You might want to disconnect the second drive (or just disable it) for the installation, as sometimes Windows decides to put it's startup partition on the second drive.

Windows installation done, I went back to Ubuntu Live USB and restored Grub2. Last catch with the whole process is that, due to some bug, it won't auto-detect Windows, so you need an entry in /etc/grub.d/40_custom file:

menuentry "Windows 7 UEFI/GPT" {
 insmod part_gpt
 insmod search_fs_uuid
 insmod chain
 search --fs-uuid --no-floppy --set=root 6387-1BA8
 chainloader ($root)/EFI/Microsoft/Boot/bootmgfw.efi
}

The 6387-1BA8 identifier is the partitions UUID, you can easily find it by doing ls -l /dev/disk/by-uuid/.

Dual-booting is usually much more trouble than it's worth, but I did enjoy getting this all to work together. Still, probably not a thing for faint of heart ;-) I also have to admit that after two weeks I no longer notice how quick boot and application start-up are (Visual Studio 2012 takes less than a second to launch with a medium size solution, it's too fast to practically measure), it's just that every non-SSD computer feels glacially slow.

In summary: why are you still wasting your time using a hard drive instead of an SSD? Replace your optical drive with a large HDD for data and put your operating system and programs on a fast SSD. The hardware upgrade is really straightforward to do!

Monday, 25 August 2008

Using a cellphone GPRS/EDGE/UMTS Internet connection through Bluetooth under Gentoo Linux

Before you start, make sure that:


  • you can browse the Internet from your cellphone (take note of the connection profile you use)

  • you have a working Bluetooth connection between your phone and the PC

  • the devices are paired for connecting without asking for confirmation

  • you have bluez-utils emerged with USE="old-daemons"

Configure a RFCOMM connection with the phone:


  • in /etc/conf.d/bluetooth set RFCOMM_ENABLE=true

  • use sdptool search DUN to find the device's Bluetooth hardware address and the channel on which the cellphone listens for RFCOMM, the scan will take some time

  • in /etc/bluetooth/rfcomm.conf add a new connection with the address and channel you just found:

#
# RFCOMM configuration file.
#

rfcomm0 {
# Automatically bind the device at startup
bind yes;

# Bluetooth address of the device
device XX:XX:XX:XX:XX:XX;

# RFCOMM channel for the connection
channel 4;

# Description of the connection
comment "Cellphone GPRS/UMTS DUN";
}

  • execute /etc/init.d/bluetooth restart, you should now have a /dev/rfcomm0 device available, and cat /dev/rfcomm0 should cause the PC to connect to the cellphone (cat will output nothing, just kill it with Crtl+C when you verify the connection works).


Kernel requirements: besides what is needed for Bluetooth, enable all options under Device Drivers / Network device support / PPP (point-to-point protocol) support. This only adds 16KB to the kernel size. Recompile, install, reboot with your new kernel (or if you really don't want to reboot, compile PPP as a module and modprobe it).


Emerge ppp with USE="dhcp". Create a network service with ln -s /etc/init.d/net /etc/init.d/net.ppp0. Configure it by creating /etc/conf.d/net.ppp0 with the following contents:


### GPRS/EDGE/UMTS configuration ###
config_ppp0=( "ppp" )
link_ppp0="/dev/rfcomm0"

pppd_ppp0=(
"noauth"
"debug"
"local"

"defaultroute"
"usepeerdns"

"lcp-echo-interval 15"
"lcp-echo-failure 3"

"lock"

"115200"
"crtscts"
)

chat_ppp0="
ABORT BUSY
ABORT ERROR
ABORT 'NO ANSWER'
ABORT 'NO CARRIER'
ABORT 'NO DIALTONE'
ABORT 'Invalid Login'
ABORT 'Login incorrect'
'' AT
TIMEOUT 5
OK 'ATH'
OK 'ATE1'
OK 'AT+CGDCONT=1,\"IP\",\"internet\"'
OK 'ATD*99#'
TIMEOUT 60
CONNECT ''
TIMEOUT 5
~--''
"
### end GPRS/EDGE/UMTS configuration ###

You'll need to replace "internet" with the name of the connection profile you use for your data transfer (this should be provided by your cellular operator - "internet" is what Plus GSM uses in Poland). Start the connection with /etc/init.d/net.ppp0 start and everything should work.


Software used:


  • sys-kernel/gentoo-sources-2.6.25-r7

  • sys-apps/openrc-0.2.5

  • sys-apps/baselayout-2.0.0

  • net-wireless/bluez-libs -3.36

  • net-wireless/bluez-utils-3.36 with USE="old-daemons"

  • net-dialup/ppp-2.4.4-r15 with USE="dhcp"


Hardware used:


  • Nokia N95 8GB

  • HP Pavilion built-in Bluetooth adapter


How-To based on articles:


Thursday, 27 March 2008

Zabawa z bootchart

Zainspirowany konkursem "kto szybciej" zacząłem kombinować z przyśpieszaniem startu mojego Gentoo. Udało mi się ściąć... 3 sekundy. Patentów wypróbowanych - całkiem sporo.


  • RC_PARALLEL_STARTUP="yes" - to są właśnie te uzyskane 3 sekundy (choć pamiętam, że z jakiegoś powodu, dawno temu, wyłączałem równoległe uruchamianie usług).

  • baselayout-2 - czas startu spadł o 30 sekund. Bardzo przyjemnie, choć wymagało ręcznego poprawiania błędów w skryptach startowych i nie potrafi wyłączyć komputera gdy ma problemy z odmontowaniem udziałów NFS (o dziwo, baselayout-1 zawsze sobie z tym radzi). Zrezygnowałem.

  • wyłączenie zbędnych usług - poleciało dhcp i distccd. Kolejne 10 sekund. Razem z poprawą z baselayout-2 miałoby to sens, ale samodzielnie - nie. Leniwy jestem, włączyłem z powrotem.

  • readahead-list - żadnej różnicy w mierzonym czasie, problemy z zależnościami pomiędzy skryptami w /etc/init.d/. Dziękuję.

  • squashfs + aufs - strasznie ryzykownie to wygląda, nie wypróbowałem.

  • "timeout 1" w grub.conf - bootchart tego nie mierzy, ale zawsze to nieco szybciej.

  • prelink - przy instalacji ebuild nie przechodzi własnych testów automatycznych. Nie.

  • LDFLAGS - pożyjemy, zobaczymy, ale tutaj raczej kolosalnej róznicy się nie spodziewam.

  • TuxOnIce, albo inaczej - hibernacja. Z nieznanych mi powodów czasem się nie wznawia. Jeśli się wznowi, to wyłącza monitor (EDIT: pomogło dodanie OnResume 99 /usr/bin/chvt 7 do /etc/hibernate/common.conf). Ale kiedy działa, to komputer startuje w 1/6 normalnego czasu. Nice. Przydało by się jakieś GUI.

Thursday, 31 January 2008

Mój domowy serwer

Jest mały, szarozielony i nazywa się snotling.

komputer 49.99
snotling ~ # cat /proc/cpuinfo
processor : 0
vendor_id : GenuineIntel
model name : Pentium III (Katmai)
cpu MHz : 448.646
flags : fpu vme de pse tsc msr pae mce cx8 sep mtrr pge mca cmov pat pse36 mmx fxsr sse
bogomips : 897.87
snotling ~ # uname -a
Linux snotling 2.6.23-gentoo-r6 #2 Thu Jan 31 13:14:15 CET 2008 i686 Pentium III (Katmai) GenuineIntel GNU/Linux

Dostała mu się jeszcze gigabitowa sieciówka, kontroler SATA, dysk 300GB i 512MB RAMu – ale to już inny paragon ;-) Tak wyglądał zaraz po przyniesieniu do domu:

snotling prosto ze sklepu

A tak po dołożeniu ulepszeń:

snotling z dodatkami

Wednesday, 28 November 2007

screen

Bardzo, ale to bardzo przydatne polecenie:

ssh -t user@host screen -RD

Otwiera połączenie ssh z sesją screen'a, co pozwala wylogować się z maszyny host bez zamykania powłoki i kończenia uruchomionych poleceń. W celu zakończenia sesji ssh należy nacisnąć [crtl] + [a], [d], potem można powrócić do (działającej ciągle na serwerze) powłoki tym poleceniem co poprzednio. Żeby zamknąć sesję screen należy po prostu wydać polecenie exit.

Friday, 2 November 2007

Konwersja .mp3 na .amr

Oczywiście wszystkie nowe komórki potrafią odtwarzać mp3. Tylko po co mi nowy telefon, jak stary nadal działa (i rozumie tylko dość egzotyczny format AMR)? Ku pamięci - konwersja plików dźwiękowych:


ffmpeg -i input.mp3 -acodec libamr_nb -ar 8000 -ab 12.2k -ac 1 output.amr 

albo (ale to już mniej telefonów będzie potrafiło odtwarzać):


ffmpeg -i input.mp3 -acodec libamr_wb -ar 16000 -ab 23.85k -ac 1 output.amr

Oczywiście plik wejściowy może być w dowolnym formacie obslugiwanym przez ffmpeg, czyli prawie każdym istniejącym ;-) Pod Gentoo trzeba ustawić flagę USE="amr" przy emergowaniu ffmpeg żeby włączyć obsługę kodeka.

Monday, 20 August 2007

PicasaWeb Downloader

Trochę ponad tydzień temu Walker chwalił się skryptem do uploadowania zdjęć do albumów PicasaWeb (program Picasa w wersji na linuksa nie posiada takiej funkcjonalności). Jego wpis przypomniał mi o leżącym odłogiem 1GB sieciowego miejsca, akurat gdy zastanawiałem się, jak przesłać przyjaciołom (aktualnie przebywającym w Norwegii) zdjęcia z wakacji. Do wgrania obrazów w końcu wykorzystałem Firefox Universal Uploader, został tylko jeden problem - jak pobrać taki album na dysk, nie instalując kobylastej Picasy?


Tomer Gabel napisał prosty konsolowy program w C#, który wykorzystuje Google Data API by zassysać całe albumy z PicasaWeb. Do wczoraj jego rozwiązanie miał jedną wadę - nie obsługiwało albumów prywatnych, wymagających znajomości klucza. Jednak Tomer uwzględnił liczne prośby użytkowników ;-) i uzupełnił brakującą funkcjonalność. PicasaWeb Downloader można pobrać z jego strony razem z kodem źródłowym w C#. Oczywiście, ponieważ to .Net, więc kompiluje się i działa również pod linuksem, przy użyciu Mono.

Monday, 19 March 2007

YaKuake dla Windows?

Pod linuxem bardzo szybko przyzwyczaiłem się do jednej prostej aplikacji: YaKuake. Genialne jest w niej to, że po naciśnięciu jednego przycisku (domyślnie F12) pojawia się schowana dotychczas konsola, po naciśnięciu go ponownie - chowa się. No i oczywiście możliwe jest uruchomienie kilku konsol w osobnych kartach. Teraz zmuszony jestem do korzystania z windows i cierpię ;-) Czy znane jest komuś podobne narzędzie dla tego "cudownego" systemu?


Update: znalazłem PoshConsole. Spełnia wymagania... teraz tylko czekam, aż pojawi się wersja, która nie pada po trzech poleceniach.

Sunday, 4 February 2007

Sane defaults

Tytuł można przetłumaczyć jako "rozsądna konfiguracja domyślna", ale to sformułowanie nie brzmi niestety tak dobrze jak angielski oryginał. O co chodzi? O to, że spora część programistów nie zdaje sobie sprawy jak ważne jest, by zaraz po instalacji oprogramowanie działało poprawnie i bezpiecznie. Spora część użytkowników nie będzie w ogóle zaglądać w rozbudowane opcje konfiguracyjne. A jeśli to nawet zrobi, to dopiero po dłuższym korzystaniu z programu. Dlatego ważne jest, aby świeżo zainstalowany software nie tworzył luk w bezpieczeństwie systemu. Przykłady zdecydowanie złych pomysłów domyślnej konfiguracji (głównie z projektów, w których uczestniczyłem, ale nie tylko):


  • użytkownik bazy danych: root, brak hasła

  • zapisywanie danych w / lub d:/ lub dowolnej innej absolutnej lokacji (za wyjątkiem /tmp albo %TMP%, zależnie od systemu)

  • kasowanie wszystkich danych z takiej lokacji (czyszczenie dysku twardego uszczęśliwia mało którego użytkownika)

  • zapis do /tmp albo %TMP% przez aplikację wieloplatformową

  • zakładanie, że aplikacja będzie uruchamiana z uprawnieniami administratora / roota

  • używanie / lub \ w zapisie ścieżek do podkatalogów

Rozsądne alternatywy:


  • użytkownik kojarzący się z nazwą programu, hasło najlepiej generowane losowo w trakcie instalacji

  • zapis w podkatalogu %APPDATA% lub ~ (nie dotyczy demonów / usług, zazwyczaj nie posiadających katalogu domowego)

  • kasowanie tylko plików utworzonych przez aplikację

  • korzystanie z File.createTempFile lub Path.GetTempFileName

  • zakładanie, że program zazwyczaj nie ma praw zapisu do katalogu, w którym jest zainstalowany

  • korzystanie z File.separator lub Path.DirectorySeparatorChar


Zdaję sobie sprawę, że nie ma szans, by użytkownicy windowsów przestali wykorzystywać konto administratora do normalnej pracy (próba częściowego wymuszenia tego przez Vistę jest chyba głównym źródłem problemów z uruchamianymi na niej programami). Ale programista powinien pamiętać, że usługi / demony uruchamiane są zazwyczaj z kont stworzonych dla nich osobnych użytkowników o okrojonych uprawnieniach. A jedynym elementem aplikacji, który próbuje cokolwiek zapisywać do jej katalogu instalacyjnego powinien być updater.


Jeszcze jedna ważna uwaga: pliki konfiguracyjne nie powinny być wersjonowane. Zamiast tego, do kontroli wersji najlepiej dodać plik z rozszerzeniem w rodzaju .example, zawierający przykładową konfigurację wraz z komentarzem, a właściwy plik konfiguracyjny oznaczyć jako ignorowany. W ten sposób programiści nie ryzykują przypadkowego wysłania do repozytorium swoich indywidualnych plików z ustawieniami. Oczywiście, przy takim podejściu aplikacja musi sobie radzić z brakiem pliku konfiguracyjnego - informując, że należy go stworzyć na podstawie przykładu lub robiąc to automagicznie. Fallback do wbudowanej konfiguracji jest często spotykanym złym pomysłem - użytkownik nie ma wtedy możliwości modyfikacji opcji, musi albo stworzyć konfigurację od zera albo zaakceptować ją w całości.

Wednesday, 29 November 2006

Leadtek Winfast TV2000 XP on gentoo (part 1 - infrared remote)

The TV2000 XP is a tv/radio tuner card with a video input slot and an infrared pilot (CoolCommand). It is based on Conexant CX23880/1/2/3 PCI Video and Audio Decoder. Complete output of lspci -vv looks like this:


02:02.0 Multimedia video controller: Conexant CX23880/1/2/3 PCI Video and Audio Decoder (rev 05)
Subsystem: LeadTek Research Inc. Unknown device 6611
Control: I/O- Mem+ BusMaster+ SpecCycle- MemWINV- VGASnoop- ParErr- Stepping- SERR- FastB2B-
Status: Cap+ 66MHz- UDF- FastB2B+ ParErr- DEVSEL=medium >TAbort- <TAbort- <MAbort- >SERR- <PERR-
Latency: 32 (5000ns min, 13750ns max), Cache Line Size 08
Interrupt: pin A routed to IRQ 22
Region 0: Memory at fa000000 (32-bit, non-prefetchable) [size=16M]
Capabilities: [44] Vital Product Data
Capabilities: [4c] Power Management version 2
Flags: PMEClk- DSI+ D1- D2- AuxCurrent=0mA PME(D0-,D1-,D2-,D3hot-,D3cold-)
Status: D0 PME-Enable- DSel=0 DScale=0 PME-

Linux kernel (2.6.17) contains drivers for this device in the Video For Linux section. You have to enable the following options:


Device Drivers --->
Multimedia Devices --->
<*> Video For Linux
[*] Enable Video For Linux API 1 (DEPRECATED)
[*] Enable Video For Linux API 1 compatible Layer
Video Capture Adapters --->
<M> Conexant 2388x (bt878 successor) support
<M> Conexant 2388x DMA audio support

For the infrared pilot to work you have to enable the evdev event interface:


Device Drivers  --->
Input Device Support --->
<*> Event Interface

Now recompile (make install && make modules modules_install for gentoo-sources) and reboot. After the system boots again, load the module cx8800 (modprobe cx8800). dmesg | tail -n 15 should report something similar to this:


cx2388x v4l2 driver version 0.0.5 loaded
ACPI: PCI Interrupt 0000:02:02.0[A] -> GSI 22 (level, low) -> IRQ 22
CORE cx88[0]: subsystem: 107d:6611, board: Leadtek Winfast 2000XP Expert [card=5,autodetected]
TV tuner 44 at 0x1fe, Radio tuner -1 at 0x1fe
cx88[0]: Leadtek Winfast 2000XP Expert config: tuner=38, eeprom[0]=0x01
input: cx88 IR (Leadtek Winfast 2000XP as /class/input/input2
cx88[0]/0: found at 0000:02:02.0, rev: 5, irq: 22, latency: 32, mmio: 0xfa000000
tuner 0-0060: All bytes are equal. It is not a TEA5767
tuner 0-0060: chip found @ 0xc0 (cx88[0])
tuner 0-0060: type set to 38 (Philips PAL/SECAM multi (FM1216ME MK3))
tda9887 0-0043: chip found @ 0x86 (cx88[0])
cx88[0]/0: registered device video0 [v4l2]
cx88[0]/0: registered device vbi0
cx88[0]/0: registered device radio0

and ls -l /dev/v4l/ should show devices radio0, vbi0 and video0, all belonging to user root and group video. Also, please note the line input: cx88 IR (Leadtek Winfast 2000XP as /class/input/input2. There should be a new event device in /dev/input/ with the same number (in this case, it will be /dev/input/event2). Unfortunately, device's name depends on the order in which devices are created by udev, and this might change. In order to find a static name of the remote, inspect the /dev/input/by-path directory. It contains device symlinks that udev created using devices' physical addresses. This is enough for a PCI card, because it will be constatant as long as the slot the card is plugged won't change. In my case, the infrared control is visible as /dev/input/by-path/pci-0000:02:03.0--event-ir.


Add cx8800 to /etc/modules.autoload/kernel-2.6 , so it will be loaded each time system starts. Now, in your /etc/make.conf, add lirc v4l v4l2 to USE flags and add a line LIRC_DEVICES="devinput". Although lirc has a driver for Leadtek Winfast TV2000 XP (named leadtek_0010), I was unable to get it to work under kernel 2.6.17 (it did not create a device node, and all attempts to use it resulted in lircd crashing and irw reporting "could not connect to socket"). Emerge lirc (and kdelirc if you want an easy way to control all KDE applications with your remote) and then execute emerge -avuDN world.


First, check if the remote works. Run lircd -d /dev/input/by-path/pci-0000:02:03.0--event-ir -n and press some buttons on the remote. Lircd should report them (although, sadly, not all keys work through the event interface). Edit /etc/conf.d/lircd and set LIRCD_OPTS="-d /dev/input/by-path/pci-0000:02:03.0--event-ir" (change the path to match your configuration). Save Leadtek Winfast TV2000 XP lirc configuration as /etc/lircd.conf. Save lirc configuration for xmms, mplayer and vlc as /etc/lircrc.


Now kill the manually started daemon and start the system one (/etc/init.d/lircd start). Add it to the runlevel (rc-update add lircd default). Start xmms/mplayer/vlc to test how your remote works. If you encounter any problems, verify that irw reports key names correctly.

Friday, 17 November 2006

Gentoo jest lepsze

Mammal chwalił się wczoraj, że Ubuntu jest szybkie. Ale to nic w porównaniu z Gentoo z prędkością 4818KB/sek.

Tuesday, 5 September 2006

NAnt, NUnit and mono 1.1.17

The new release of mono contains various bug fixes, many of them concerning the AppDomain class, creation of application domains and communication between them. Unfortunately, those changes broke the <nunit2> task in NAnt scripts run on Linux (strangely, everything works fine on Windows). When executed, task reports an incompatible version of NUnit assembly used to compile the tests. However, when nant is run with -verbose switch, the real exception can be examined - mono is unable to load the NAnt.NUnit2Tasks.dll into the new AppDomain.


A temporary workaround is to execute the tests with the <exec> task. Start with defining a template target:


<target name="test-assembly">
<if test="${platform::is-unix()}">
<!-- nunit2 task is borked on linux with mono 1.1.17 -->
<property
name="nunit.exe"
value="${framework::get-assembly-directory(framework::get-target-framework())}/nunit-console.exe" />
<echo message="${test-assembly}" />
<exec program="${nunit.exe}" workingdir="${binaries-dir}" useruntimeengine="true">
<arg value="/nologo" />
<arg value="${test-assembly}" />
</exec>
</if>
<if test="${not platform::is-unix()}">
<nunit2 verbose="true">
<test assemblyname="${binaries-dir}/${test-assembly}" />
<formatter type="Plain" />
</nunit2>
</if>
</target>

The target still calls <nunit2> task when run on Windows, as it is faster then executing nunit-console.exe. On Linux it finds the nunit-console.exe from the appropriate framework version and uses it to execute the test. To use the template, two properties have to be set:


<target name="TestObject.test" depends="TestObject.dll">
<property name="binaries-dir" value="bin_test"/>
<property name="test-assembly" value="TestObject.dll" />
<call target="test-assembly" />
</target>

You can hardcode the binaries-dir or set it once for the entire build to avoid repeating it in every call to test-assembly.

Saturday, 17 June 2006

Dlatego lubię plusa

emerge -e world && echo "emerge -e world finished" | mail 48663280xxx@text.plusgsm.pl || echo "emerge failed" | mail 48663280xxx@text.plusgsm.pl

Saturday, 8 April 2006

IPX and mounting Novell Netware shares on Gentoo

Start by enabling kernel support for IPX networking and NCP filesystem. For 2.6 kernels (it's simmilar on 2.4), you need to enable the following settings:

Networking -->
Networking options -->
<*> The IPX protocol
File systems -->
Network file systems -->
<*> NCP file system support (to mount NetWare volumes)
[*] Clear remove/delete inhibit when needed
[*] Use NFS namespace if available
[*] Use LONG (OS/2) namespace if available

On 2.6 kernels enabling NCP shows quite a long list of options. As I did not understand their meaning ;-) , I settled for defaults, which work just fine. You may want to enable National Language Support. I gave up on this as I was unable to find a working combination of codepage/iocharset for my local Novell server.


So, recompile (make install && make modules modules_install for gentoo-sources) and reboot. Emerge ncpfs (emerge -av ncpfs). I wanted my machine to automount the Netware share on every boot, thus I added an entry to /etc/fstab:

SERVER/user		/mnt/novell	ncpfs		uid=root,gid=disk,owner=root,passwd=pass,mode=660,volume=VOL1	0 0

Obviously, you have to replace SERVER with your local Novell servername, user with your username, VOL1 with the name of volume you wish to mount (or ommit volume=VOL1 at all to mount the entire server) and pass (in passwd=pass) with your guess_what. Of course, /mnt/novell has to exist.

There are a few caveats to keep in mind if you choose this approach. First and foremost, your password is visible to anyone who can read your fstab. This can be avoided by storing it in a config file, readable only to root (see man ncpfs for details). Second, the mount is fully accessible to anyone in the group disk (to allow only root, drop gid=disk from fstab entry).


Next, you'll want to actually connect to IPX network. I assume that it is working on the very same ethernet connection you use as eth0. Execute ipx_configure --auto_interface=on --auto_primary=on and wait a few seconds for it to settle (it backgrounds immediately, but give it some time to actually connect). Then, examine ifconfig output for lines containing IPX. Their number may vary, depending on number of IPX versions enabled on the server. If all went well, you are now able to mount your Novell share with a simple mount /mnt/novell.


Now, the init scripts. To connect to IPX on boot, add this code into /etc/conf.d/net.eth0:

postup() {
# This function could be used, for example, to register with a
# dynamic DNS service. Another possibility would be to
# send/receive mail once the interface is brought up.
result=`ipx_configure --auto_interface=on --auto_primary=on`

COUNTER=0
while [ $COUNTER -lt 30 -a `ifconfig|grep IPX|wc -l` -lt 2 ]
do
let COUNTER+=1
sleep 1
done

if [ $COUNTER -eq 30 ]
then
return 127
else
return $result
fi
}

The '2' in '-lt 2' is the number of lines, containing IPX, present in ifconfig output after the connection has settled. Change it as fit. '30' in '-lt 30' and '-eq 30' is the allowed timeout for connecting, ie. if IPX is not up after 30 seconds script reports failure.

To properly mount your NCP shares (after the network connection is initialized), gentoo has to recognize them as network filesystems. Thus, add NET_FS_LIST="ncpfs" to both /etc/conf.d/localmount and /etc/conf.d/netmount.

Saturday, 18 March 2006

The gentoo way

Wczoraj w końcu mogłem zrobić to, na co miałem od tak dawna ochotę - zmienić OS na moim stanowisku w pracy. Slackware'a miałem zdecydowanie dość, a do tego po moich ostatnich próbach "usprawnienia" system zachowywał się... różnie.


Tym razem sam instalowałem system (poprzednio stanowisko przygotowywał starszy programista), więc mogłem wybrać pasujące mi oprogramowanie. Gentoo wypuściło właśnie nowe płyty, z automatycznym instalatorem, żal nie spróbować ;-)


Gentoo LiveCD 2006.0 bez problemu uruchomiło się w trybie graficznym, z Gnome. Żadnych problemów z przeglądaniem stron spod Firefox'a, jest nawet OpenOfice, jak ktoś bardzo potrzebuje z niego korzystać mając w tle trwającą instalację. Sam graficzny instalator... pomysł dobry, wiele osób boi się Gentoo słysząc o instalacji za pomocą bash'a. Z wykonaniem nieco gorzej - musiałem sobie go odpuścić, bo nie daje sobie rady, gdy coś odbiega od standardu.


A maszyna w firmie nieco odbiega. Tak właściwie, to miał to chyba być serwer Oracle'a, ale potrzeby był desktop dla pracownika i jakoś tak wyszło.... :-D Pentium Prescott HT jest procesorem zupełnie normalnym (chociaż długo trwało, zanim Slack dał się przekonać do tego HT - ale pod nim nawet całej pamięci - 1GB - nie dało się wykorzystać, bo były problemy z włączeniem HIGHMEM). Nieco mniej normalny jest brak karty dźwiękowej i dwie karty graficzne, z tego jedna na PCI (on-board jest Radeon 7200, na PCI - nie PCI Express - Radeon 9200 - bo ten pierwszy, to się podobno do pracy nie nadaje :P ). Kontroler SCSI Adaptec AIC-7902 z dwoma napędami jest najciekawszym elementem konfiguracji. Pod Slackiem wykorzystywany był z niego jeden dysk.


Zaczęło się od uruchomienia macierzy dyskowej: RAID1 na /boot, RAID0 na / i dwie niezależne partycje na swap. Na Gentoo Wiki proces jest przystępnie opisany. Całość ruszyła, dała się zamontować, wystartował automatyczny instalator (jeszcze byłem dobrej myśli), pokrzyczał, że nie może sam zamontować dysków, zaczął działać... Najpierw okazało się, że instalacja jest błyskawiczna (podobno 7.5 minuty) tylko dla domyślnych ustawień. Jeśli ktoś chce np. KDE zamiast Gnome, będzie musiał poczekać dłużej... Chwilę później instalator pogubił się całkowicie i odmówił dalszej pracy.


No nic, trzeba było zatem wrócić do ręcznej działalności. Spod X'ów szło to o tyle wygodniej, że można mieć na jednym ekranie dwie konsole i jeszcze dokumentacja się zmieści, i google jak czegoś potrzeba.


Nareszcie widać możliwości tego sprzętu. Prędkość odczytu z dysku, zmierzona za pomocą hdparm, to 66MBps. Z macierzy - 125MBps. Jak na stację roboczą - monstrum :-D . Zostało mi jeszcze skonfigurowanie X'ów. Ech, gdyby tak dostać drugi monitor...

Monday, 30 January 2006

Kanji, katakana etc.

Z zupełnie nieznanych dla mnie przyczyn, spora część moich najbliższych znajomych zanieczyszcza swoje przemyślenia dużą ilością znaczków spoza alfabetu łacińskiego. Jeszcze żeby ograniczali się do względnie małej (kilkadziesiąt glifów, jeśli się nie mylę) katakany. Ale jest pełen przekrój przez alfabety japońskie, znaki chińskie, niedługo pewnie ktoś zacznie dla sportu pisać po koreańsku…


Na pytanie jakiej czcionki potrzebuję, by nie widzieć wielokrotnych '?' w tekście ich stron otrzymałem standardową odpowiedź WFM. No tak, jak komuś system instalował informatyk w Chinach, to nie ma problemu z chińskimi czcionkami. Potem pojawiła się propozycja, abym z 'Panelu Sterowania -> Opcje Regionalne -> Języki' doinstalował obsługę języków wschodnioazjatyckich… Miałem mały problem - pod KDE nie ma Panelu Sterowania ;-) . A w Windows taka instalka waży dodatkowe 230MB. I u mnie, z nieznanych mi przyczyn, nie działa.


Na szczęscie Microsoft przygotował czcionkę Arial Unicode, dołączaną do Windows XP oraz Office'a 2000. Zaraz, u mnie znów jej nie ma. W legalnym Windows... chyba zbyt mocno "zoptymalizowałem" płytę instalacyjną. Dla podobnie zagubionych, którym Arial Unicode prawnie się należy, podpowiedź: plik nazywa się arialuni.ttf, waży ok. 23MB, i jest łatwy do znalezienia w sieci. Czcionka zawiera glify dla całej tablicy Unicode, pełen zestaw znaków chińskich, japońskich, koreańskich etc. Zainstalować i zapomnieć.


Jeśli używasz linux'a, pewnie nie będziesz kupować Windows XP tylko by dostać czcionki. Alternatywy OS pod gentoo pojawią się w systemie po wykonaniu polecenia


emerge media-fonts/kochi-substitute media-fonts/arphicfonts media-fonts/baekmuk-fonts

Pierwsza czcionka to znaki japońskie, druga chińskie a trzecia koreańskie. [info znalezione na Gentoo Forums]

Wednesday, 23 November 2005

NTFS rw - final

No i wróciłem do sterowników NTFS z kernela. Paragon ntfs4linux trial nie chce się skompilować pod Gentoo, nie mam ochoty z nim walczyć - szczególnie, że trial nie pozwala na zapis :-/ a full nie znalazłem nigdzie. Captive zostaje, gdybym koniecznie potrzebował coś zapisać, ale nie nadaje się niestety do normalnego użytkowania.

NTFS w trybie read/write

Ciąg dalszy zmagań z systemami plików. NTFS w trybie zapis i odczyt marzył mi się od dawna... Jądro 2.6 udostępnia niby taką funkcjonalność - ale to pic na wodę, zapis ogranicza się do możliwości zmieniania istniejących plików. Captive (używający sterowników z Windows XP SP1a) właśnie testuję...
Problem pierwszy: nie rozumie junctions. To jest do przeżycia, ale driver z kernela sobie z nimi radzi :-/
Problem drugi: wydajność. Kopiowanie plików z prędkością 200-230 KBps to nie jest szczyt marzeń. Do przełknięcia... trudniej, ale jeszcze.
Problem trzeci: stabilność. Już wiem czemu w drzewie portage (używam Gentoo) ebuild był zamaskowany jako unstable. Driver wewnętrznie działa tak, że co 1MB danych wykonuje umount/mount by zapisać dane... Jeśli coś pójdzie nie tak, ostatnie 1MB zmian jest tracone dla zachowania spójności danych na dysku... Pomaga ręczny umount/mount po każdej zmianie, bez tego ryzykujesz, że wszystko zniknie. Ew. pojawi się znów, jeśli coś kasowałeś. To już do przełknięcia nie jest.

W planach na dziś wypróbowanie jeszcze softu od Paragon.